
How to Prevent Spam Orders in WooCommerce: Signs, Causes and Safe Fixes
Bursts of fake or failed orders can mean bots or card testing. Learn the signs, what to tell your payment provider and…
An Indian store has to charge, show and record GST correctly. See how WooCommerce tax settings, classes and rates fit together, and what to confirm with your accountant.
GST in WooCommerce means configuring an online store so that Goods and Services Tax is calculated, shown and recorded correctly on every order. WooCommerce has flexible tax settings, but it does not know your tax obligations: you decide the rates, classes and display, and your accountant confirms them. This guide explains how the WooCommerce tax options work, how they can be arranged for an Indian store, and how to test the setup with real orders before customers pay.
Enable tax calculations under WooCommerce → Settings → General, choose whether your product prices include tax, decide which address determines the tax, create a tax class for each rate you charge, and add rate rows under the Tax tab. Test an order from your own state and one from another state, check the cart, checkout, emails and invoices, and confirm everything with a qualified accountant. This article is not tax advice: GST rates, rules and invoice requirements are set by the government and change.
How this guide was prepared: it is research-based. We used the official WooCommerce tax documentation listed under Sources, checked on October 23, 2026. We do not state GST rates, because they change; use the official GST portal and your accountant. We did not test your store, and nothing here is legal or tax advice.
WooCommerce’s tax feature is switched on with “Enable tax rates and calculations” in WooCommerce → Settings → General. After that a Tax tab appears. There you choose whether prices are entered with tax, whether tax is calculated from the customer’s shipping address (the default), billing address or the shop base address, the shipping tax class, rounding, and how prices and tax totals are displayed in the shop and at checkout. Tax rates are stored in tax classes: the Standard rates class always exists, and you can add more classes for other rates. For GST, a common pattern is to use classes to separate products charged at different rates.
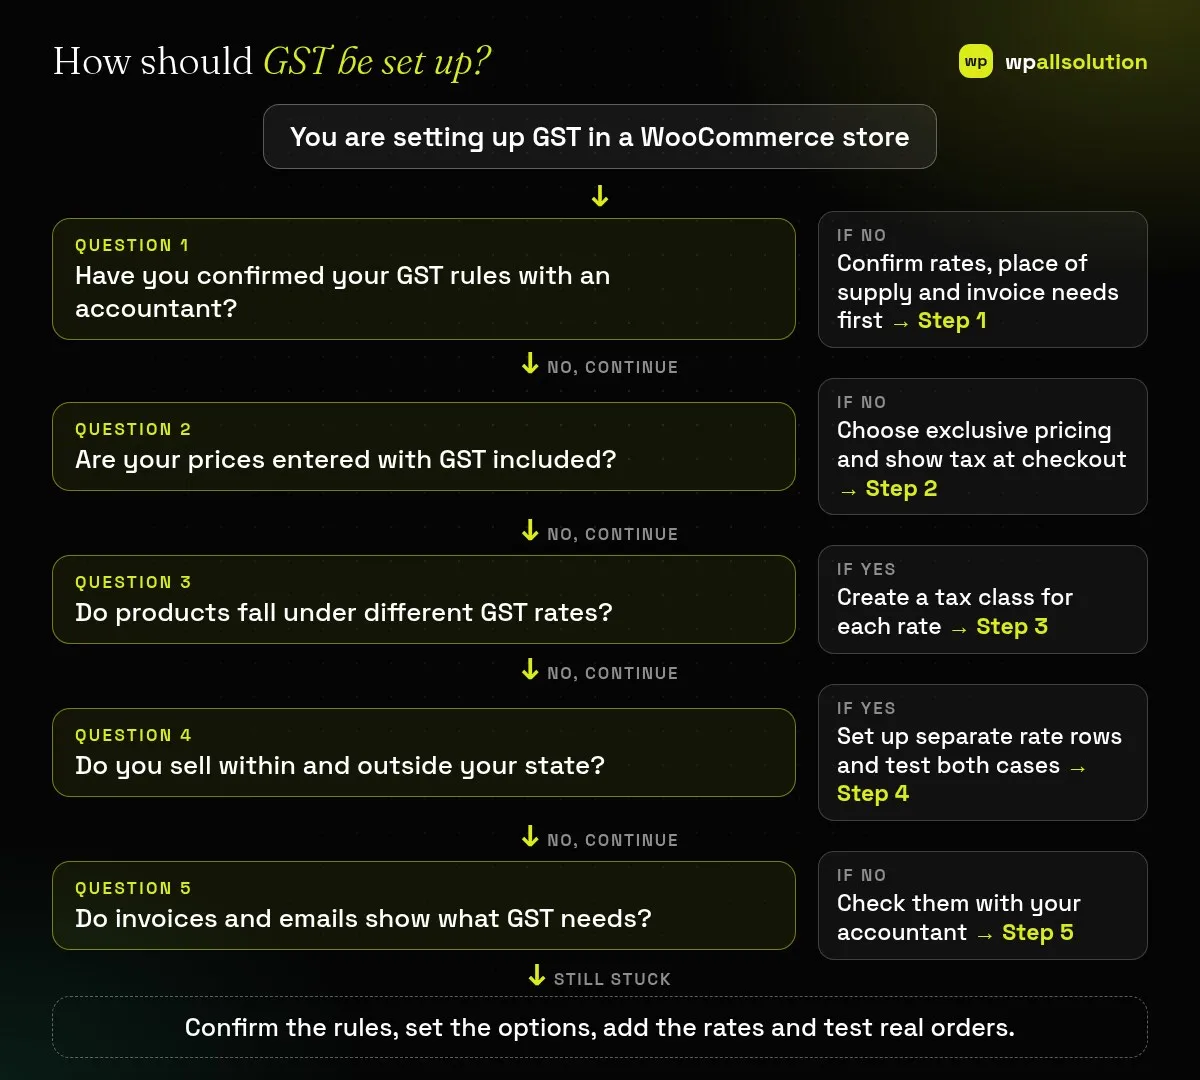
Before you touch the settings, confirm your GST registration status and number, the rate for each product category, whether your sales are treated as within your state or between states, and what your invoices must show. In general, GST on a sale within a state is split into two parts (central and state), while a sale to another state uses a single integrated tax, but the exact treatment depends on your case. The official GST portal and your accountant are the authority, not a plugin or an article.
Enable tax rates and calculations in WooCommerce → Settings → General and save. On the Tax tab, decide whether the prices you enter include tax. Many Indian stores enter prices exclusive of tax and show the tax separately; others show tax-inclusive prices. Choose what you will say on your site, and be consistent in the shop, cart and checkout (the display options let you choose including or excluding tax). Our own pricing page, for example, states that India prices are exclusive of GST. Decide the base for the calculation (shipping address is the default), and check rounding: WooCommerce notes that mismatched display settings can cause off-by-one differences, which its recommended settings help avoid.
Under the Tax tab, add additional tax classes, one per line (for example one for each rate your products use), and save. Each class gets its own subtab for its rates. Then assign every product to the right tax class in its Tax class field. A product left in the wrong class will be taxed at the wrong rate.
In each class, click Insert row and fill in the country code (IN), the state code, postcode or city if needed, the rate percentage and a tax name. WooCommerce lets you use * as a wildcard. The priority field matters: only the first matching rate at each priority applies, and lower numbers are considered first, while the compound option applies a rate on top of earlier taxes. This means a within-state sale that needs two tax parts usually needs rows with different priorities, whereas a sale to another state needs a single integrated tax row; how you arrange them must follow your accountant’s guidance. Test it: place one order shipped to your own state and one shipped to another state, and read the totals line by line. The rate table can also be imported and exported as CSV, which helps when you maintain many rows, but never use sample rates in production.
Check the cart, the checkout, the order confirmation and the emails: do they show tax the way you intend, as one total or itemised by tax name? Check any PDF or custom invoice you send, because a tax invoice has legal requirements that WooCommerce’s standard emails may not meet by themselves; your accountant can tell you what yours must show. Test refunds and coupons too. For general store testing routines, see our WooCommerce maintenance checklist and WooCommerce checkout not working.
Not by itself. You configure the rates, or use an extension, and you confirm the result with your accountant.
That is a business choice. Both are possible; the setting is “Prices entered with tax”.
You choose: the customer’s shipping address by default, the billing address or the shop base address. Ask your accountant which applies to you.
Yes, with the CSV import on the rates table. Use your own verified rates, not the sample file.
Confirm the rules, set up taxes in a test copy, then run orders from different states. If you want help configuring the store, wpallsolution offers a WooCommerce checkout service and WordPress maintenance packages. We are not tax advisers and cannot promise compliance.
Bursts of fake or failed orders can mean bots or card testing. Learn the signs, what to tell your payment provider and…
Product imports fail for a few predictable reasons. Check the file format, column names, SKU matching, variations, images and server limits one…
If some customers cannot finish checkout, you lose sales. Use this WCAG 2.2 based checklist to test keyboard use, labels, errors, focus…
Black FridayCyber Monday sale
Before you go,
Our biggest discount of the year on the first payment of every maintenance plan.
BF2026 at checkout